
Overview
Each Ondexx Site is equipped with a File Management System (or File Manager) used to store uploaded files. These files can then be embedded in pages in several ways, or simply stored in the File Manager until needed. The contents of File Managers are not shared across different Sites.
The File Manager can be accessed by any user with the View File Manager right. However, certain operations will also require the appropriately named specific rights: Add Files, Delete Files, and/or Move or Rename Files
A shortcut to the File Manager can be enabled in Site Settings under Administration > Site Management > Site Settings by checking the box labelled View File Manager. Once enabled, any user with the appropriate rights can access the File Manager with the top level File Storage button.
Users can also quickly access the File Manager of Sites for which they have been granted the relevant rights from the Files dropdown in the top level instance navigation pane.
The File Manager can be accessed through any Content Editor, by opening the Document Manager or Image Manager. The File Manager can also be accessed through the Document Viewer page component.
Interface Overview
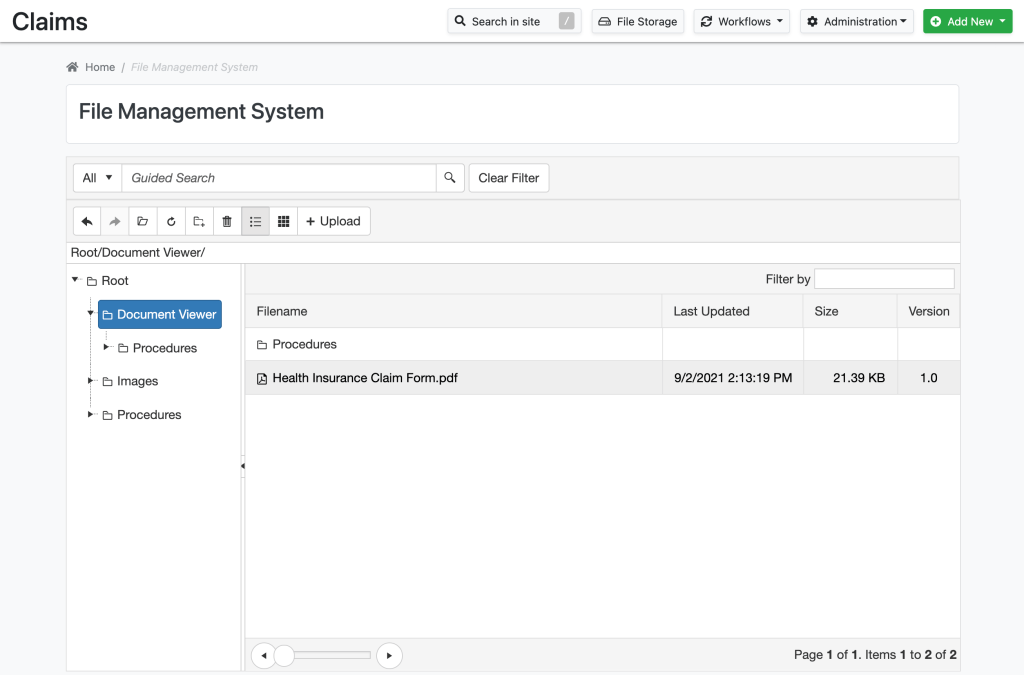
The File Manager uses a standard folder-file layout, where files are kept in user-created folders for organization.
The tree view on the left side shows what folder in the structure the user is currently viewing. Users can click on the folders shown on the left side to quickly navigate between folders. While navigating, the Back and Forward buttons can be used to undo or a redo a navigation action.
The contents of the currently viewed folder itself are shown on the right. Double-clicking a file will download it, and double-clicking a folder will open it. Folders can also manually be opened by selecting them, and clicking the Open button next to “Forward”.
If needed, the Refresh button
The File Manager’s viewing mode can be changed between Grid View and Thumbnails View with the two buttons next to “+ Upload”.
Files in the File Manager can be searched for in the Guided Search bar. Simply begin typing a query, and matching files will be returned in a dropdown.
The currently viewed folder can also be filtered upon with the Filter by field. Simply begin typing a query, and only files that match it will be shown.
Moving Files and Folders
Files and folders can be moved by clicking and dragging. Simply click and drag the folder or file, into the new desired location in the tree view on the right.
Creating Folders
Folders can be created by users with the Add Files right, with the following process:
- Navigate to the folder in which the new folder will be to be contained.
- Click the New Folder button, next to the “Refresh” button. Alternatively, you can use right-click > New Folder.
- Enter the desired name of the new folder.
- The folder will be created.
Deleting Files and Folders
Files and folders can be deleted by users with the Delete Files right, with the process below. Please note that, when deleting a folder, all files and folders contained within it will also be permanently deleted.
- Click the folder or file to be deleted.
- Click the Delete button (the trash can icon).
- Click Confirm.
- The folder or file has been deleted.
Right-Click Options
There are various options available when right-clicking files and folders in the File Manager:
- View Details will open the File Details page for that file.
- Download File will download the selected file.
- Rename will open a menu to rename the selected file or folder.
- New Folder will open a menu to create a new folder in the current location.
- Upload File will open the menu to upload new files.
Uploading Files
Uploading files to a Site’s File Manager can be done by any user with the Add Files right. Multiple files can be uploaded at once, however, each file must be under 500MB in size. Any file type can be uploaded.
Files can be uploaded to a File Manager with the following process:
- Navigate to the folder in which you would like the uploaded files to be placed.
- Click the + Upload button. Alternatively, one can use Right-click > Upload File.
- Click Select, and choose the file you would like to upload from your computer. Repeat this step in a new row for each file to be upload.
- Click Upload, and wait for the upload to complete. Depending on the size and amount of files being are uploading, this could take some time.
- Your files have been uploaded to the chosen folder.
Related Articles
Files replaced in the File Manager as versioned, rather than overwritten. This allows previous versions of a file to be archived. For more information on file versioning, refer to this help article.
The File Details page shows additional information about a file, such as which pages a file is used in, the version history of the file, and more. For more information on using the File Details page, refer to this help article.